Friday, November 30, 2018

Query Transformations

I rarely do much work in PS Query, but while doing some other troubleshooting for PS Query related issues, I noticed the "Transformations" tab in Query Manager. I am running PT 8.56.x in HCM 9.2, but looks like this has been around since 8.53 or 8.54. 

So decided to do a quick test to see what this does and how it works. So the benefit here is that the output can be transformed to create reports right out off the output delivered by PS Query.

So as part of this POC used any existing query. Transforming the output to HTML and using a XSL transformation to highlight the row when a certain condition is matched.

On the Transformation tab within Query Manager, click on Add XSLT which opens a window to key in free-form XSLT text. It would have been nice if there is a wizard of some sort to build the XSLT. 

Gave it a Name and in the "Output File Type" lookup selected HTML. Following are the available choices - 001, A01, ABA, AET, APC, CSS, CSV, D01, DAT, DTD, DTL, ERR, GIF, GIR, HTM, HTML, IDX, JCD, JS, LIS, LOG, MDL, MT9, N01, NVT, NXT, OUT, PS, SQL, STDOUT, SYS, TMP, TRC, TRN, TXT, XLSM, XLSX, XML, XSD, ZIP

Not sure what is the difference between HTM and HTML, but I selected HTML. My sample XSLT is designed as follows.

<?xml version="1.0" encoding="UTF-8"?> <xsl:stylesheet xmlns:xsl="http://www.w3.org/1999/XSL/Transform" version="1.0"> <xsl:template match="/"> <html>
<!-- defined a style for the row that is going to be highlighted -->
<style type="text/css">
tr.redRow td {
font-size: 100%;
font-family: calibri;
font-weight:bold;
background-color: #FF2626;
padding-right: 10px;
color:#000;
}
</style>
<body>
<!-- in the html body defined a html table --> <table border="1">
<!-- Added a heading --> <font color="blue"> <h2>Sample Transformation test</h2> </font>
<!-- defined column headers --> <tr> <th>Employee ID</th> <th>Last Name</th> <th>First Name</th>
<th>Location</th> </tr>
<!-- Here I am selecting the data from PS Query --> <xsl:for-each select="query/row"> <tr>
<!-- defined a if condition to check if -->
<!-- value is McLean then highlight the row --> <xsl:if test="L.DESCR='McLean'"> <xsl:attribute name="class">redRow</xsl:attribute> </xsl:if>
<!-- Output the PS Query results --> <td> <xsl:value-of select="A.EMPLID" /> </td> <td> <xsl:value-of select="C.LAST_NAME" /> </td> <td> <xsl:value-of select="C.FIRST_NAME" /> </td> <td> <xsl:value-of select="L.DESCR" /> </td> </tr> </xsl:for-each> </table> </body> </html> </xsl:template> </xsl:stylesheet>

So saved this and hit the preview button to preview the results. My query uses runtime prompts so those pop'ed up first, provided values for them and results are displayed in a new window (disable pop-up blocker or allow pop-up for this site).


Sample Transformation test


Employee IDLast NameFirst NameLocation
12345DoeJohnMadrid
13244DoeJaneEgypt
43423HuftonAbcdeLondon
42343FlemingJillMcLean
34423TiboldJozsefLondon
67554FarrellWilliamJohannesburg
43556MyersTonyIreland
75757KramerNicoleMcLean
27341WadaMarkNew York
27045RogerWaiMcLean
27098WayneJessicaNew York
27125GarciaGuillermoNew York
75688Deepak ShirguppiMaryland

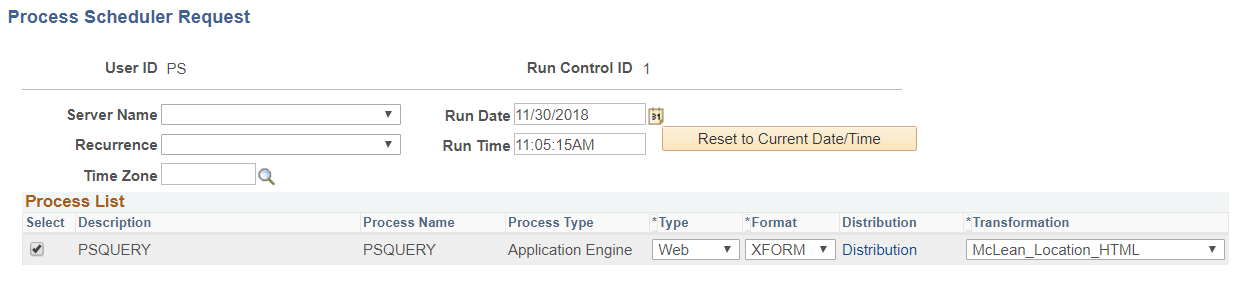
If this query is scheduled using Query Scheduler option then a new format of XFORM is available and then I can pick any transformations (can define n number of transformations) that I have defined on the query.


Sunday, August 12, 2018

Windows App/Prcs Service Management

Tools 8.56.07 and HCM 9.2 installed via classic method (non-DPK)

Created one PS_CFG_HOME pointing to E:\pscfg
Under this I have 
appserv
appserv\DEV
appserv\TST
appserv\prcs\DEV
appserv\prcs\TST

So if I use PS_HOME\appserv\psadmin to create service for the above config then it will create one service for both the application servers and process schedulers. So if I need to start/stop one domain or just the app or prcs of one domain then its not possible.

The service created via psadmin runs the command
PS_HOME\bin\server\winx86\psntsrv.exe "E:\pscfg"
which basically applies to all domains under PS_CFG_HOME.

So I used Ruby which is packaged with the DPK installables to create 4 unique services so that I can start/stop each service individually. I had downloaded PUM26 DPK so used the setup folder and PT-DPK-WIN-8.56.07-1of2.zip and PT-DPK-WIN-8.56.07-2of2.zip from that location. 
Ran the following command in my CMD session as admin


psft-dpk-setup.bat --env_type midtier --domain_type appbatch

The initial part will install the puppet software, which is what we need. Quit the installation once that was done.

Created appserver_win_service.rb under each application server domain and prcs_win_service.rb under each process scheduler domain. Took the one created for PUM as a sample and then editted that accordingly.

Then create the service manually in the CDM session.

Application Server

sc create PsftAppServerDomain{name_of_domain}Service DisplayName= PsftAppServerDomain{name_of_domain}Service binpath= "C:\PROGRA~1\PUPPET~1\Puppet\sys\ruby\bin\ruby.exe E:\pscfg\appserv\{name_of_domain}\appserver_win_service.rb" group= Network

sc description PsftAppServerDomain{name_of_domain}Service "PeopleSoft AppServer Domain {name_of_domain} Service"

Process Scheduler 

sc create PsftPrcsDomain{name_of_domain}Service DisplayName= PsftPrcsDomain{name_of_domain}Service binpath= "C:\PROGRA~1\PUPPET~1\Puppet\sys\ruby\bin\ruby.exe E:\pscfg\appserv\prcs\{name_of_domain}\prcs_win_service.rb" group= Network

sc description PsftPrcsDomain{name_of_domain}Service "PeopleSoft Prcs Domain {name_of_domain} Service"


Start application server and process scheduler manually first via the classic psadmin method. Once both start cleanly shutdown both via psadmin and then attempt to start via service.

My new service executes a command like below
Path_to_ruby.exe E:\pscfg\appserv\{name_of_domain}\appserver_win_service.rb

I created the config file appserver_win_service.rb which is a text file with ruby commands which in turn uses psadmin command line to start/stop service.

So I have 4 .rb files for each service.

Saturday, June 30, 2018

Wildcard SSL Certificates (CN/SAN)

We had a need to enable SSL on all our non-production PeopleSoft environments. So decided to implement or create one SSL certificate which would be applicable for all the environments. 

Following are the details of this exercise.
I am running PT 8.56.xx on HCM 9.2 and Weblogic 12c on a Windows 2016 VM but this should work for any release. 

So in my case I have two webservers (web1.mycompany.com and web2.mycompany.com) in my non-production PeopleSoft landscape and I wish to use the same certificate on both the webservers. 

PeopleSoft delivers a wrapper called as pskeymanager.cmd (or .sh) which essentially runs the keytool java command to create a java keystore. 

When you use the wrapper to generate a new store or to generate a new certificate request it prompts for the CN (common name) value which generally is the VM name - so in my case it would be web1.mycompany.com or web2.mycompany.com. So if I generate it as web1.comycompany.com then I won't be able to use this certificate on web2 and vice-versa. So the plan is to provide the value for CN as *.mycompany.com, which is essentially a wildcard value. So any webserver in mycompany.com would be able to use this SSL certificate.

When we do this there is another attribute called as SAN (Subject Alternate Name) that needs to be populated. In my experience I noticed that a browser like Chrome uses this to verify the validity of the certificate but a browser like IE doesn't use it.

The vanilla pskeymanager.cmd doesn't use the san attribute so we have to customize this script as follows.

Search for string :gencsr and then a few lines below this would be the keytool command to generate a CSR (Certificate Signing Request). Towards the end of that command add 

-ext san=dns:web1.mycompany.com,dns:web2.mycompany.com

or

-ext san=dns:*.mycompany.com

Now use the pskeymanager.cmd command to create a new keystore and generate the CSR. Then provide the CSR to your CA (Certificate Authority) for signing and once your receive the response certificate verify that the SAN value is populated.

Load this to weblogic and test. Now you can use the same SSL certificate on all the webservers in the mycompany.com domain.

Saturday, April 21, 2018

PSCA Install and Configuration - Upgrade to 9.2

In this POC I am upgrading HCM 9.1 PT 8.53.x to HCM 9.2 PT 8.56.x

VM setup 

  1. I have done native OS installs on Windows 2016 VM of PUM Image 25 (VM name: PUM25) and Upgrade Source 03 (VM Name: UPG03) and those systems are up and running. 
  2. Next I have copy of production up on SQL Server 2014 on a Windows 2016 VM. (VM Name: DB).
  3. I have two other Windows 2016 VMs one for App/Prcs VM and the other for PIA. Native OS - DPK method install of middleware like tuxedo, weblogic and tools, app homes using the command line
  4.           psft-dpk-setup.bat --env_type midtier --deploy_only --deploy_type all

             No domains have been deployed yet
  5. Software is installed on E:/psft (E:\ is local drive on the VM)

PSCA/Oracle Client/PT Client Setup
I am running my PSCA on the App/Prcs VM mentioned above. 
Map drives to E$ on PUM25, UPG03 and \\PUM25\E$\psft\pt\hcm_pi_home

Installed SQL Server Management Studio and related drivers for SQL Server 2014. 

Opened CMD as admin and navigated to \\PUM25\E$\psft\pt\tools_client and ran SetupPTClient.bat -t

This will install Oracle client and Oracle based PT Client on the C:\ drive. This PT Client will be used to connect to PUM25 and/or UPG03.
Also installed PSCA - default location on C:\ drive.

Created 32-bit and 64-bit ODBC connections for my copy of prod database. PT 8.53 just needs 32-bit but when PSCA makes the connectivity test it uses 64-bit version.

Verified that I can connect to PUM24, UPG03 and Copy of Prod via application designer as well as the appropriate SQL tool.

PSCA Configuration
Launch PSCA as admin
Select Update Manager

General Option 
    - PS_HOME - point it to the local install ps_home
    - Create local directories to store download, output and staging and point them appropriately
    - point to SQLCMD.EXE file for SQL Query Tool
PUM Source - point to the Oracle db, SQL Client Tool would be path to sqlplus.exe, PS_HOME, PS_APP_HOME and PS_CUST_HOME would be the Oracle PT client installed in the prior step. 
Don't have to enable any check-boxes
PI_HOME - will be the mapped drive to hcm_pi_home mapped earlier
PIA URL to PUM signon page
Did not enable EM Hub

Upload Upg Source db to PUM
Launch the "Upload Target Database Information to Image" option and select the Upgrade Source database and upload that to the PUM Image.
Once done login to PUM PIA, navigate to PeopleTools > Lifecycle Tools > Update Manager > Update Manager Dashboard and Click on Define Upgrade Package.
Named my package HR91TO92.
Follow prompts select required for upgrade fixes too.
So it should create HR91TO92UPG and HR91TO92RFU. 
Now back in PSCA, Select HR91TO92UPG from the drop-down and it should prompt for downloading HR91TO92RFU too. So download both packages to the download directory.
As we will doing a tools upgrade too at the same time, copy PS_HOME\PTU\updPTU856.zip to the download folder manually.

Selected "Upgrade to New Application Release"
Initial Pass is selected by default
Setup target database - copy of prod
SQL Client tool - will be path to SQLCMD.EXE
Current home - will be the copied hr91 directory, I have one directory which has both tools and app so provided the same path for PS_HOME, PS_APP_HOME and PS_CUST_HOME
Enabled Configure New Homes for Upgrade
Provided paths for new homes the ones created by the DPK install on this VM.

Setup Upgrade Source database - this is similar to the PUM Source database configuration done earlier.

Select Upgrade page - should show Upgrade Source and target information correctly. Application and Tools upgrade sections will be selected and grayed out. Each one should have a package listed under the appropriate section. 
Select the Required for Upgrade Package section.
then continue to compatibility check screen. Verify that all are return green. If anything is not then step through previous screens to verify the inputs and selections. A total of 11 checks are performed.

Click on Finish and the upgrade job will be created and PSCA will start running the steps. The first step is a manual stop.

It creates 3 jobs, RFU, UPG and PT Upgrade.

Thursday, April 19, 2018

SQR: FindFiles

Via peoplecode its very easy to read a directory and fetch filenames - leveraging delivered function "FindFiles". Now try doing the same in SQR. Not trivial at all. 

Here is what I had to do. I am running PT 8.55.x but its pretty much the same in any recent PT versions.
I essentially have to run a dir command at the Windows level get the filenames based on the wildcard and write the filenames to a file. Then read the file for the filenames. Once done, I can delete the temp file which has the list of filenames. if the dir cmd does not return anything for my wildcard search then the temp file will be empty.
The other important thing here is the WAIT parameter for the call system command. If that is not provided then the reading of the temp file does not work, as it takes the system some time to write the contents to the temp file. 

let $comspec = getenv('COMSPEC')
let $TempFile = 'C:\temp\temp_file.txt'
let $FindFiles = $comspec || ' /c dir /b \\my_network_path\share\some_directory\*.pdf > ' ||  $TempFile
call system using $FindFiles #call-status WAIT

open $TempFile as 10 for-reading record=50 #filestat
while 1 
  read 10 into $file-name:50
if $file-name != '' or #end-file
break
end-if
end-while

close 10

! delete text file
let $delCmd = $comspec || ' /c del /F /Q ' || $TempFile 
call system using $delCmd  #call-status WAIT

Way longer than a simple FindFiles command via peoplecode, but this does the trick.